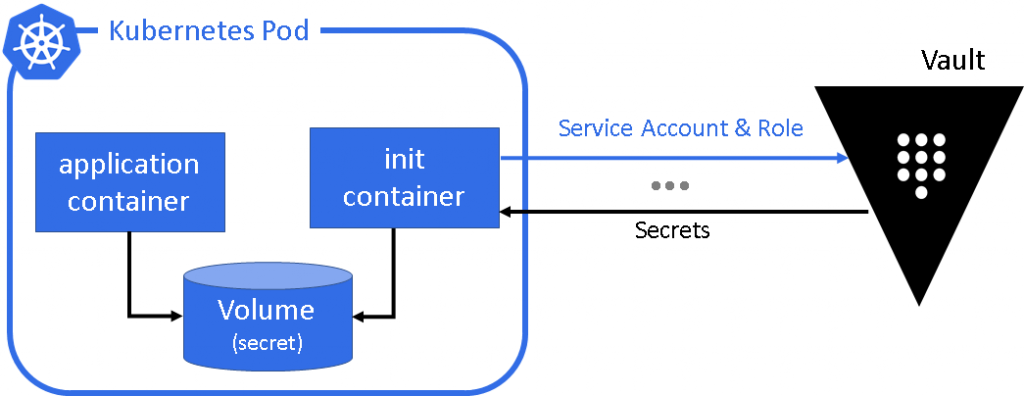
Usando Vault en Kubernetes

Introduction
In the previous article, we configured Vault with Consul on our Kubernetes cluster. Now, it’s time to go further and use it to provision secrets to our pods/applications. If you don’t have Vault configured yet, please refer to Getting started with HashiCorp Vault on Kubernetes.
In this article, we will create an example using mutual TLS and provision secrets to our app. The files used in this example are available in this repo.
Creating a certificate for our new client
We need to enable kv version 1 on /secret for this to work, then create a secret and store it as a Kubernetes secret for our app (myapp). We use the certificates from the previous article, continuing to build on that.
# Enable kv version 1 on /secret path
vault secrets enable -path=secret -version=1 kv

# Create a client certificate for our new client (in case we need to revoke it later)
$ consul tls cert create -client -additional-dnsname vault

# Store the certs as a Kubernetes secret for our app pod
$ kubectl create secret generic myapp \
  --from-file=certs/consul-agent-ca.pem \
  --from-file=certs/dc1-client-consul-1.pem \
  --from-file=certs/dc1-client-consul-1-key.pem
Service account for Kubernetes
In Kubernetes, a service account provides an identity for processes running in a pod to communicate with the API server.
$ cat vault-auth-service-account.yml
  ---
  apiVersion: rbac.authorization.k8s.io/v1beta1
  kind: ClusterRoleBinding
  metadata:
    name: role-tokenreview-binding
    namespace: default
  roleRef:
    apiGroup: rbac.authorization.k8s.io
    kind: ClusterRole
    name: system:auth-delegator
  subjects:
  - kind: ServiceAccount
    name: vault-auth
    namespace: default

# Create the 'vault-auth' service account
$ kubectl apply --filename vault-auth-service-account.yml
Vault policy
Now, we define a read-only policy for our secrets to ensure that our app can only read secrets, not modify them.
# Create a read-only policy file, myapp-kv-ro.hcl
$ tee myapp-kv-ro.hcl <<EOF
# If using K/V v1
path "secret/myapp/*" {
    capabilities = ["read", "list"]
}

# If using K/V v2
path "secret/data/myapp/*" {
    capabilities = ["read", "list"]
}
EOF

# Create the policy
$ vault policy write myapp-kv-ro myapp-kv-ro.hcl

# Store the secret in Vault
$ vault kv put secret/myapp/config username='appuser' password='suP3rsec(et!' ttl='30s'
Kubernetes configuration
Next, we set environment variables for the Minikube environment and enable Kubernetes authentication for Vault. We validate the setup using a temporary pod.
# Set environment variables
$ export VAULT_SA_NAME=$(kubectl get sa vault-auth -o jsonpath="{.secrets[*]['name']}")
$ export SA_JWT_TOKEN=$(kubectl get secret $VAULT_SA_NAME -o jsonpath="{.data.token}" | base64 --decode)
$ export SA_CA_CRT=$(kubectl get secret $VAULT_SA_NAME -o jsonpath="{.data['ca\.crt']}" | base64 --decode)
$ export K8S_HOST=$(minikube ip)

# Enable Kubernetes authentication in Vault
$ vault auth enable kubernetes

# Configure Vault to communicate with Kubernetes
$ vault write auth/kubernetes/config \
    token_reviewer_jwt="$SA_JWT_TOKEN" \
    kubernetes_host="https://$K8S_HOST:8443" \
    kubernetes_ca_cert="$SA_CA_CRT"

# Create a role for Kubernetes authentication
$ vault write auth/kubernetes/role/example \
    bound_service_account_names=vault-auth \
    bound_service_account_namespaces=default \
    policies=myapp-kv-ro \
    ttl=24h

# Test the setup with a temporary pod
$ kubectl run --generator=run-pod/v1 tmp --rm -i --tty --serviceaccount=vault-auth --image alpine:3.7
$ apk add curl jq
$ curl -k https://vault/v1/sys/health | jq
The deployment and consul-template configuration
The deployment mounts the certificates we created and uses them to fetch secrets from Vault.
# Deployment YAML file (see example-k8s-spec.yml in the repo)
---
apiVersion: v1
kind: Pod
metadata:
  name: vault-agent-example
spec:
  serviceAccountName: vault-auth
  volumes:
    - name: vault-token
      emptyDir:
        medium: Memory
    - name: vault-tls
      secret:
        secretName: myapp
    - name: config
      configMap:
        name: example-vault-agent-config
    - name: shared-data
      emptyDir: {}

  initContainers:
    - name: vault-agent-auth
      image: vault
      volumeMounts:
        - name: config
          mountPath: /etc/vault
        - name: vault-token
          mountPath: /home/vault
        - name: vault-tls
          mountPath: /etc/tls
      env:
        - name: VAULT_ADDR
          value: https://vault:8200
      args:
        [ "agent", "-config=/etc/vault/vault-agent-config.hcl" ]

  containers:
    - name: consul-template
      image: hashicorp/consul-template:alpine
      volumeMounts:
        - name: vault-token
          mountPath: /home/vault
        - name: shared-data
          mountPath: /etc/secrets
    - name: nginx-container
      image: nginx
      ports:
        - containerPort: 80
      volumeMounts:
        - name: shared-data
          mountPath: /usr/share/nginx/html
The vault-agent-config.hcl handles token fetching and template rendering:
exit_after_auth = true
auto_auth {
    method "kubernetes" {
        mount_path = "auth/kubernetes"
        config = { role = "example" }
    }
    sink "file" { config = { path = "/home/vault/.vault-token" } }
}
The consul-template-config.hcl renders a file with secrets:
vault {
  vault_agent_token_file = "/home/vault/.vault-token"
}
template {
  destination = "/etc/secrets/index.html"
  contents = <<EOH
  <html>
  <body>
  <p>Some secrets:</p>
  <ul>
  <li><pre>username: {{ .Data.username }}</pre></li>
  <li><pre>password: {{ .Data.password }}</pre></li>
  </ul>
  </body>
  </html>
  EOH
}
Testing the setup
Now, let’s deploy and test if the app is able to fetch secrets from Vault.
# Deploy the app
$ kubectl apply -f example-k8s-spec.yml

# Check the logs for vault-agent-auth
$ kubectl logs vault-agent-example vault-agent-auth -f

# Port-forward to test the app
$ kubectl port-forward pod/vault-agent-example 8080:80
$ curl -v localhost:8080
Closing notes
This article was heavily inspired by this guide. We added mutual TLS for enhanced security. In a future article, we will explore auto-unsealing Vault.
Errata
If you spot any errors or have suggestions, please let me know.
No tienes cuenta? Regístrate aqui
Ya registrado? Iniciar sesión a tu cuenta ahora.
-
Comentarios
Online: 0
Por favor inicie sesión para poder escribir comentarios.